
Amikor a Photoshopban választani kell, valójában kétféle ember létezik - azok, akik tudják, hogyan kell használni a Pen eszközt, és azok, akik küzdenek. A legtöbb ember elhalasztja a Pen Tool használatát a lehető leghosszabb ideig, míg mások soha nem járnak hozzá annak megtanulásához, mert azt gondolják, hogy ez egyszerűen zavaró, túl bonyolult és egyszerűen természetellenes.
Végső soron a Photoshop-ban szenvedő munkájuk szenved, mivel szinte mindent elragadnak a Lasso eszközre támaszkodva, amit nem tudnak kiválasztani a téglalap alakú vagy az elliptikus sátor eszközök segítségével. Ebben az Adobe Photoshop oktatóanyagban véget vetünk a szenvedésnek. Megtanuljuk, mennyire könnyű valóban választani a Pen Tool segítségével.
Most, amikor azt mondom, hogy „könnyű”, nem értem, hogy elolvassa ezt az útmutatót, és azonnal tollmezővé válik. A Pen Tool használatának megtanulása nagyon hasonlít a kerékpározás megtanulására. Miután megtudta, ez teljesen természetesnek tűnik, és azon tűnődni fog, vajon valószínűleg nem tudhatja-e valaki, hogy használjon oly egyszerű dolgot. De ahhoz, hogy ehhez a pontig érjünk el egy kis gyakorlást és erőfeszítést, és miközben minden könyvet elolvasunk arról, hogy miként kell kerékpározni, megtaníthatjuk a pedálok, a sebességváltók és a fékek működésének alapjait, csak addig, amíg a kerékpáron küzd az egyensúly megtartása érdekében, hogy az igazi tanulás megkezdődik.
A Pen Tool egyik nagyszerű dolga, hogy ez nem valami kizárólagos a Photoshop számára. Messze van tőle! Gyakorlatilag minden népszerű fotószerkesztő, grafika és oldalrendező program egy vagy más formában használja a Pen eszközt, tehát miután megtanulta, hogyan kell használni a Photoshop-ban, máris jól megérti, hogyan kell sokféle helyen használni. más programok is!
Hol találok a toll eszközt?
Mielőtt elkezdenénk beszélni arról, hogy mi a Pen eszköz vagy hogyan kell használni, meg kell vizsgálnunk, hogy előbb hol található meg a Photoshopban. A Toll eszközt az Eszközök palettán találja meg, amely az Alak eszközök, a Típus eszköz, az Útválasztás (fehér nyíl) és a Közvetlen választás (a fekete nyíl) eszközökhöz van csoportosítva (lásd a képet a bal oldalon).
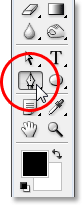
Photoshop toll eszköz
Ez természetesen felveti a kérdést, hogy miért nem csoportosítva a többi szerszámmal (a téglalap alakú sátor eszköz, az elliptikus sátor eszköz, a Lasso eszköz stb.), Ha választhatunk a Pen eszköz segítségével? az Eszközök paletta tetején? Miért van ott azokkal az egyéb eszközökkel, amelyek nyilvánvalóan nem szelekciós eszközök?
Ez egy kiváló kérdés, és egyszerűen csak olyan kiváló válasz érkezik hozzá, amire egy pillanat alatt jutunk.
Miért hívják "toll" eszköznek?
A Pen eszköz használatának egyik első akadálya, akárcsak a Photoshop sok más dologához, a neve, mivel elvégre ha egy dolog van, amit mindenki, aki valaha is megpróbálta használni, akkor ez nem egy toll. Legalábbis nem az a fajta toll, amelyre általában gondolt, amikor meghallja a "toll" szót. Próbálkozzon ezzel a neveddel írni ugyanúgy, mintha egy tollra írná a nevét egy papírlapra, és valószínűleg csavarodott, kusza rendetlenséggel és egymással összefonódó dolgokkal fog végződni (természetesen azt hiszem, hogy nagyon jól lehet, hogyan írja alá a nevét).
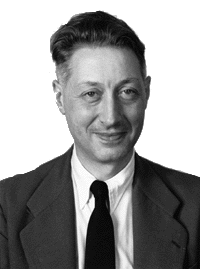 Pierre Bezier
Tehát ha nem úgy viselkedik, mint egy hagyományos tinta, akkor miért nevezik azt a Pen Tool? A Toll-eszközt az évek során valójában számos dolognak hívták, és ezzel nem értem azokat a fajta dolgokat, amelyeket talán csalódás pillanataiban hívtál meg. Valószínűleg hallotta, hogy Bezier tollnak vagy Bezier eszköznek nevezik, és ez azért van, mert Pierre Bezier nevű ember (az ő a bal oldalon) készítette, egy francia mérnök és mindennapi okos srác, aki feljött a képzeletbeli matematika, amely hajtja az eszközt, miközben a Renault autógyártó vállalatnál dolgozik (a Pen Tool-t eredetileg az autók tervezésének elősegítésére hozták létre).
Lehet, hogy már hallotta a Path Tool nevű Pen Tool eszközt, és ez valójában a legmegfelelőbb név. A Toll eszköz célja az „utak” kidolgozása. A Pen Tool használatával történő kiválasztáshoz egyszerűen konvertáljuk az útvonalat vagy útvonalakat, amelyeket kiválasztottunk. Ez azonban mindig egy utakkal kezdődik.
Rövid kódok, műveletek és szűrők beépülő modul: Hiba a rövid kódban (ads-basics-middle-2)
Mi az út?
Az "út" egy őszintén szólva egy olyan program, amely kissé helytelennek tűnik egy olyan programban, mint a Photoshop. Ennek oka az, hogy a Photoshop elsősorban pixel alapú program. A tipikus digitális képet alkotó apró négyzet pixelek millióit elveszi, és velük dolgozik. Az útvonalaknak viszont nincs semmi köze a képpontokhoz, ezért mondtam, hogy azok helytelennek tűnhetnek egy olyan programban, amelyet elsősorban a képpontok szerkesztésére és rajzolására használnak.
Egy út valójában nem más, mint egy vonal, amely az egyik pontról a másikra megy, egy olyan vonal, amely teljesen független és nem törődik az alatta lévő képpontokkal. A vonal lehet egyenes vagy ívelt, de mindig egyik pontról a másikra megy, és ahogy említettem, ennek semmi köze sincs a képen látható pixelekhez. Egy út teljesen elkülönül a képtől. Valójában egy útvonal annyira külön van, hogy ha a képet a képernyőn látható útvonallal próbálja kinyomtatni, akkor az nem jelenik meg a papíron. Továbbá, ha JPEG.webp fájlként mentette el a képet, és feltöltötte egy weboldalra, akkor is, ha a képet a képernyőn látható útvonallal mentette el a Photoshop alkalmazásban, akkor nem fogja látni a webhely képében. Az útvonalak csak a szemének és a Photoshopnak szólnak. Senki más nem látja őket, hacsak nem járnak el a számítógép mellett, miközben dolgozik.
Mindig szükségünk van legalább két pontra egy út létrehozásához, mivel tudnunk kell, hol kezdődik az út és hol végződik. Ha elegendő pontot használunk, hogy vissza tudjuk hozni az utunkat arra a pontra, ahonnan kezdődött, akkor különféle alakzatokat hozhatunk létre az utakból, pontosan így működnek a Photoshop különféle Shape Tools-i. A Téglalap eszköz egy pontokkal összekötött útvonalakat használ téglalap alakú rajzolásához. Az Ellipse eszköz pontokkal összekötött útvonalakat használ elliptikus alak rajzolásához stb. Ugyancsak működik a Photoshop Type Tool, bár a Photoshop kezeli a betűtípust kissé másképp, mint a normál alakzatokat, de a Photoshop összes típusa alapvetően útvonalakból készül. Valójában konvertálhatja a típust alakzatba, amely megadja ugyanazokat az útvonal-szerkesztési lehetőségeket, amelyekkel a típust kapja, amikor alakokkal dolgozik.
Lehet, hogy már hallotta a vázlatoknak nevezett útvonalakat is, és ez elég jó leírást ad arról, hogy mi az út, vagy legalábbis mi lehet az út. Rajzolhatunk egy négyzet alakú ösvényt, és ha semmi mást nem csinálunk vele, mivel nem töltsük be színnel, vagy rajzoljunk rá rá, akkor csak egy négyzet alapvető vázlata van. Ugyanaz a kör vagy bármely más alak, amelyet rajzolunk. Maga az út csak az alak vázlata. Csak addig, amíg megteszünk valamit az útvonallal, például kitöltjük, körvonalat nem alkalmazunk, vagy válogatássá konvertáljuk, az út valójában nem csupán alapvető vázlattá válik.
Kiválaszthat egy teljes útvonalat az Útválasztó eszköz (más néven "fekete nyíl" eszköz) segítségével, vagy kiválaszthat egyes pontokat vagy útvonal- szegmenseket a Közvetlen választó eszköz ("fehér nyíl" eszköz) segítségével. A „szegmens” vagy a „vonalszakasz”, amelyet néha hívnak, bármely pont két pont között. Például egy téglalap alakú pálya négy pontból áll (egy-egy sarokban), és az egyes pályák, amelyek összekötik a pontokat a felső, az alsó, a bal és a jobb oldal mentén a téglalap alakjának kialakításához, az út szakaszok . Maga a tényleges út az alakját alkotó minden egyes útvonal-szegmens kombinációja.
Ez kissé zavaró lehet, szóval lássuk, mire gondolok. Nyisson meg egy új dokumentumot a Photoshop alkalmazásban. Nem számít, milyen méretű. A 640x480 méretet választom a presetek listájából, de amint mondtam, nem számít, hogy melyik méretet választja. Válassza ki a Pen eszközt az Eszközök palettából. A Toll eszközt a billentyűzet P betűjének megnyomásával is kiválaszthatja.
A két toll eszközmódja
Most, mielőtt folytatnánk, először meg kell győződnünk arról, hogy utakkal dolgozunk, és ez azért van, mert a Pen Tool valójában két különböző módban működhet, és alapértelmezés szerint a másikot használja. Ha a Toll eszközt kiválasztja, akkor a képernyő tetején található Beállítások sávban három ikonból álló csoportot látunk:

A Photoshop Beállítások sávja mutatja a három ikon csoportját, amelyek a három Pen Tool üzemmódot képviselik.
Tudom, hogy azt mondtam, hogy kétféle módban működhet a Pen eszköz, és mégis, mintha zavarossá tennék a dolgokat, három ikon van, de a jobb oldalon lévő ikon, azaz a Kitölteni képpontot ikon, szürkén jelenik meg, és munka közben nem érhető el. a toll eszközzel. Csak akkor kapható, ha a különféle Shape Tools-okkal dolgozik, tehát valójában csak két ikonra van szükségünk.
A bal oldali ikon az Alakrétegek ikon, más néven "nem a kívánt", és ezt az alapértelmezés szerint választja. Ha együtt dolgoznánk a Pen eszközzel, azzal a kiválasztott ikonnal, akkor alakzatokat rajzolnánk, mintha a különféle alakú eszközök bármelyikét használnánk, azzal az eltéréssel, hogy egy előre meghatározott alak, például egy téglalap vagy egy ellipszis rajzolása helyett bármilyen alakzatot rajzolhatunk, amit akartunk. Mint már mondtam, nem erre törekszünk. Szeretnénk a mellette lévő ikont, az útvonalak ikont, tehát lépjen tovább, és kattintson rá, hogy kiválassza:

Photoshop oktatóanyagok: Kattintson az Opciók sáv „Útvonalak” ikonjára, hogy a Pen eszközzel dolgozzon az utakkal.
A Toll eszköz kiválasztása és az Opciók sávban kiválasztott Paths ikon használata után kattintson egyszer a dokumentum bármelyik oldalára. Ne kattintson és húzza, csak kattintson. Ha ezt megteszi, hozzáad egy kis négyzetpontot. Itt kibővítettem:

Pont hozzáadásához kattintson egyszer a dokumentum belsejébe a Pen Tool segítségével.
Ez az első pont, amelyet éppen hozzáadunk, az útunk kezdőpontja. Jelenleg nincs valódi útunk. Csak kiindulási pontunk van. A "pontot" technikailag horgonyzónak vagy rögzítési pontnak nevezik, és azért nevezték el, mert rögzíti az utat a helyén. Ez az első pont rögzíti a dokumentum belsejébe vezető pont elérési útját. Ahogy további pontokat adunk hozzá, mindegyikük rögzíti az utat a helyén az adott helyen.
Adjunk hozzá még egy pontot. Kattintson valahol máshol a dokumentumon belül. Bárhol meg fogja tenni. Kattintunk valahol a kiindulópontom jobb oldalán:

Photoshop oktatóprogramok: Adjon hozzá egy második rögzítési pontot, ha valahol a dokumentum belsejébe kattint.
Most hozzáadtam egy második rögzítési pontot, és nézd meg, mi történt. Most egyenes vonal van, amely összekapcsolja a két pontot! Ez az egyenes vonal az én ösvényem. Mint már korábban említettem, legalább két pontra van szükség az elérési út létrehozásához, mivel tudnunk kell, hol kezdődik az út és hol ér véget, és most, hogy van kezdő és végpont egyaránt, a Photoshop képes volt összekapcsolni a két pont együtt, megteremtve az utunkat.
Adjunk hozzá néhány további pontot csak szórakozásból. Kattintson még néhányszor a dokumentum különböző pontjain. Ne ismét kattintson és húzza, csak kattintson:
Adjon hozzá további pontokat a dokumentumon belüli különböző pontokra kattintva.
A fenti képen további hét rögzítési pontot adtam hozzá, ha a Pen Tool segítségével különböző pontokra kattintottam, és minden egyes hozzáadáskor az elérési út hossza megnőtt, mert egy új útvonal "szegmens" lett hozzáadva az előző pont és az új pont. Útvonalam most kilenc rögzítési pontból és nyolc útszakaszból áll. Folytathatnám a dokumentumon belüli kattintást, hogy további rögzítési pontokat és útvonal-szegmenseket adjak hozzá, de most nagyon szeretném megtenni az utat, így teljes formát képez.
Út lezárása
Út bezárásához csak annyit kell tennie, hogy ismét rákattint a kezdeti kiindulási pontra. Ha az egérmutatót a kiindulási pont fölé vitte, egy kis kör jelenik meg a toll ikon jobb alsó sarkában:

Egy kis kör jelenik meg a toll ikon jobb alsó sarkában, amikor a kurzort az út kezdeti kiindulási pontja fölé viszi.
Ez a kör azt mondja nekünk, hogy hamarosan "teljes körre" jönünk az ösvényünkkel, és ott fejezzük be, ahol kezdődött. A bezáráshoz kattintson közvetlenül a kiindulási pontra.
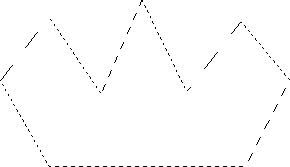
Az alábbiakban láthatjuk, hogy az ösvényem zárt pályává vált, és most egy alak alapvető vázlata:
Az út már bezárt, a kiindulási ponton végződik, zárt utat hozva létre.
Annak ellenére, hogy ezt az utat csak szórakozásból rajzolták meg, mint például egy példát arra, hogyan lehet rajzolni egy alapútot a Pen Tool segítségével, ezt az utat könnyen választássá alakíthatom. Ehhez szükségünk van a Photoshop Útvonalak palettájára, és ezt tovább vizsgáljuk.
Út fordítása kiválasztáshoz
Eddig megvizsgáltuk, mi az út, és hogyan lehet rajzolni egy alapútot a Photoshop Pen Tool segítségével. De hogyan lehet kiválasztani az utat?
Könnyen! Van néhány módszer arra, hogy egy utat választássá alakítsunk, ideértve egy praktikus billentyűparancsot is, de mielőtt megvizsgálnánk a gyors utat, nézzük meg a hivatalos utat. A "hivatalos módszer" magában foglalja a Photoshop Paths palettájának használatát, amelyet a Rétegek palettán és a Csatornák palettán talál össze:
A Photoshop útvonalak palettája.
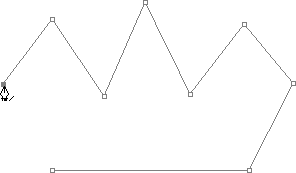
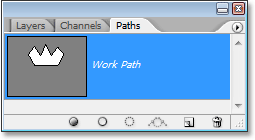
Első pillantásra a Paths paletta nagyon hasonlít a Photoshop Layers palettájára, az Adobe szándékosan így tette, így jobban fogja érezni magát. Láthatjuk az éppen létrehozott út alakjának miniatűr előnézetét, és alapértelmezés szerint a Photoshop az utat „Work Path” -nek nevezi, ami alapvetően egy képzeletbeli módszer az „átmeneti” kifejezéshez, mintha egy másik Útmutató most anélkül, hogy ezt az utat először átneveznénk valami másra, ezt helyettesíti az új út. Csak egy „Munka útja” lehet, ezért ha meg akarja tartani, akkor duplán kattintania kell annak nevére a Paths palettán, és el kell neveznie valami másat, mielőtt új elérési utat létrehozna.
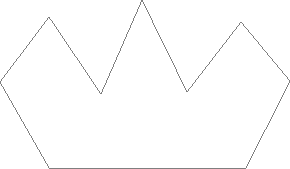
Mivel az utam kissé koronának tűnik, kétszer kattintom a "Munka út" nevére, amely megjelenik a Photoshop Save Path párbeszédpanelen, és átnevezem az útomat "Crown":

Egy ideiglenes „Munkaútvonalat” elmenthet egyszerűen annak átnevezésével.
Ha kész vagyok, rákattintom az OK gombra, és ha újból megnézem az Útpaletta palettáját, eléggé biztosan látom, hogy a „Munkaútomat” koronának nevezték:
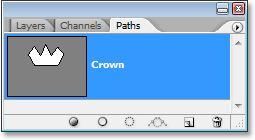
A Paths paletta, amely azt mutatja, hogy az elérési utat "Crown" -nak nevezték el.
Átnevezésével az elérési út mentésre kerül, és nem tűnik el rajtam, ha új útvonalat készítek. Emellett a mentett útvonalak a Photoshop dokumentummal kerülnek mentésre, tehát most, ha elmentem a dokumentumomat, az elérési út mentésre kerül azzal, és amikor legközelebb megnyitom a dokumentumot, az elérési út továbbra is ott lesz a Paths palettában.
Útvonal mentése nem olyan, amit tennie kell ahhoz, hogy válogatássá változtassa. A legtöbb esetben, ha a Toll eszközt választásokhoz használja, akkor nincs szüksége az elérési útra, miután kiválasztott belőle, tehát nem kell azt elmentenie. Ha mégis meg akarta menteni, csak nevezze át valami másra, mint a "Munkaút", és elmenti.
Ha az utat választássá kívánjuk tenni, ha a Path paletta aljára nézünk, akkor számos ikon látható. Ezek az ikonok lehetővé teszik számunkra, hogy különböző dolgokat tegyünk az ösvényünkkel. Az első bal oldali ikon a Út kitöltése az előtér színével ikon, és amint a neve is sugallja, rákattintva az utat meg fogja tölteni a jelenlegi előtér színével. Érdekes, de nem erre vágyunk. A bal oldali második ikon az ecsetvonalon látható ecsetvonás, amely a jelenlegi kiválasztott ecsettel egy lökést gyakorol a pályánkhoz.
Ez nagyszerű módja annak, hogy érdekes effektusokat hozzon létre a Photoshopban, de azért, amit itt csinálunk, egy utat válogatással fordítva, nem az is, amit akarunk. A kívánt a bal oldali harmadik ikon, a betöltési út kiválasztási ikonként:
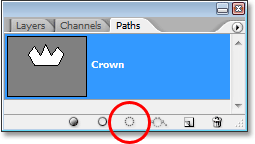
Az „Út betöltése mint választás” ikon az Út paletta alján.
Amint rákattintunk erre az ikonra, a dokumentumon belüli elérési útválasztásom válik, mintha a Photoshop bármelyik szokásos kiválasztási eszközével létrehoztam volna:
Az elérési utat most kiválasztássá alakították.
Olyan egyszerű! Valójában ennél is könnyebb, mert van egy billentyűparancs, amely lehetővé teszi az elérési utat kiválasztássá alakítását anélkül, hogy egyáltalán át kellene váltania az Út palettára. Amikor elkészítette az elérési utat, és készen áll arra, hogy kiválasztássá változtassa, egyszerűen nyomja meg a Ctrl + Enter (Win) / Command + Return (Mac) gombokat, hogy a Photoshop konvertálja az elérési utat kiválasztássá.
Most már kissé nyilvánvalóbbnak tűnik számukra, hogy miért, bár a Pen Tool nagyon szelekciós eszköz, nem csoportosítva az Eszközök paletta tetején található többi kiválasztó eszközzel. Ennek oka az, hogy a Toll eszköz elsősorban út eszköz. Kiválasztásokat hoz létre azáltal, hogy először útvonalakat hoz létre, és ezért sokkal inkább hasonlít a különféle Shape Tools és Type Type eszközökhöz, amelyek mindegyike útvonalakat használ, mint az alapvető kiválasztási eszközöknél, mint például a Téglalap alakú Marquee eszköz vagy a Lasso Szerszám, amely csak pixeleken alapul választ.
Nézzünk egy gyakorlati példát arra, amit eddig megtanultunk. Itt van egy fénykép egy stoptábláról néhány sziklás szikla előtt:

Fotó egy stop jelről.
Tegyük fel, hogy ki akarom választani azt a stoptáblát, hogy átmásoljam a saját rétegére. A stop jel nem más, mint egyenes vonal sorozat, amely ezt rendkívül egyszerűvé teszi. Először szükségem van egy útvonal kezdőpontjára, tehát a jel bal felső sarkában kezdtem el kattintva egyszer megtenni egy kezdeti rögzítési pontot. Ebben az esetben nem igazán számít, hol kezdjem az utat, de a bal felső sarokban indulok:
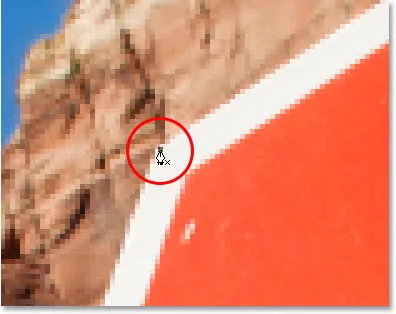
Ha egyszer kattint a stoptábla bal felső sarkában, az út megkezdi a kezdeti rögzítési pontot.
Figyelje meg, hogy miként kattintva nagyítottam ide. Könnyebbé válik, ha a Toll eszköz segítségével választja meg, hogy kicsit nagyítson a képen. Ilyen módon biztos lehet abban, hogy az útját csak a kiválasztott területen belül tartja.
Jelenleg nincs útvonalam, csak van egy kezdőpontom az úthoz. Az út létrehozásához mindössze annyit kell tennem, hogy a jel körül megyek, és minden sarokba rögzítek egy rögzítési pontot, ahol az útnak irányt kell változtatnia. Amint hozzáadom az egyes rögzítési pontokat, megjelenik egy új útvonal-szegmens, amely az előző rögzítési pontot összekapcsolja az újval, amíg egészen a jel körül nem megyek. Az elérési út bezárásához egyszerűen visszatértek a kezdeti kiindulási pontra. Kicsit nehéz látni az alábbi képernyõn, de most már van egy útom a teljes stoptábla körül, beleértve a hozzá csatolt oszlopot is, egyszerűen azáltal, hogy a sarkokba kattintottam, ahol az útnak meg kell változtatnia az irányt:

A képen a stop jel körül megjelenik egy út.
Ha most megnézem a Paths palettát, nagyon világosan látom, hogy a stop jel alakjában van egy útom:
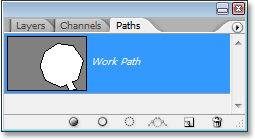
A Photoshop Paths palettája mutatja a stop jel körül húzott utat.
Figyelje meg, hogy a Photoshop nevezte az utat „Munka útjának”, ami azt jelenti, hogy ez az út ideiglenes, és elveszítjük, ha más útvonalat hozok létre anélkül, hogy először az átnevezésével mentenék meg. Még ha nem is hozok létre új útvonalat, akkor is elveszítem, amikor bezárom a dokumentumot, kivéve, ha először mentem. De nem kell mennem ezt az utat, így nem fogok aggódni miatta. A legtöbb esetben sem azért kell aggódnia.
Ahhoz, hogy az útvonalamat kiválasztássá alakítsam, a Rétegek palettájának alján válasszuk a Betöltési útvonalat mint kiválasztási ikont, vagy ugyanolyan könnyen megnyomhatom a Ctrl + Enter (Win) / Command + Return (Mac) billentyűket:
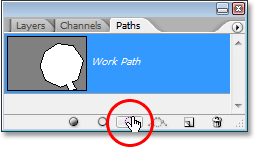
Kattintson a Paths paletta "Út betöltése betöltése kiválasztásaként" ikonra, vagy nyomja meg a "Ctrl + Enter" (Win) / "Command + Delete" (Mac) billentyűket az elérési út konvertálásához.
Amint megteszem, az elérési utomat átváltják egy kiválasztássá, és a stop jel meg van jelölve:

A stop jel most kiválasztásra kerül, miután az utat válogatássá konvertálta.
Visszakapcsolok a Rétegek palettára, és a stop jel átmásolására a saját rétegére a Ctrl + J (Win) / Command + J (Mac) billentyűparancsot használom, amely a táblát önmagára helyezi. réteg a háttérréteg felett:
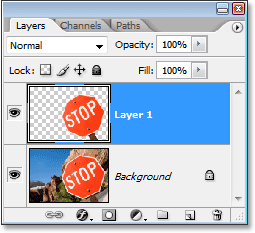
A stoptáblát a saját külön rétegére másolták.
Mivel a jel most a saját rétegén van, megtehetek bármit, amit szeretek, cserélje a hátteret egy másik képpel, vagy fekete-fehérre tehetem a hátteret, miközben hagyom a táblát színesben, bármit is gondolok. A lényeg az, hogy könnyen megválaszthattam a táblát, ha a sarokba kattintottam a Pen Tool segítségével, amely létrehozott egy utat a jel körül, majd egyszerűen konvertáltam az elérési utat kiválasztássá.
A Photoshop Pen Tool használatával történő kiválasztásában eddig megtudtuk, hogy a toll mindenképpen szelekciós eszköz, mint a Photoshop általánosan használt szelekciós eszközök, például a Téglalap alakú sátor és a Lasso Tools, de ez ahelyett, hogy a szelekciókat alapozza A pixeleken, mint a többi eszköz, a Pen Tool útvonalakat húz, amelyeket ezután könnyen kiválasztásokká alakíthat, akár az elérési út palettán, akár a gyorsbillentyű segítségével.
Ezért a toll nem az Eszközök paletta tetején található, más pixelelapú kiválasztó eszközökkel, hanem inkább az elérési út eszközökhöz van csoportosítva, mint például a különféle Shape Tools, Type Type, valamint az elérési és a Selection eszközök . A Pen Tool az utakról szól, nem pixelekről.
Megtanultuk, hogy rögzítési pontokat adhatunk a dokumentumunkba, amelyek rögzítik az elérési utat a helyén, egyszerűen rákattintva a különböző pontokra a Pen Tool segítségével, és mivel egyre több rögzítési pontot adunk hozzá, minden új pontként létrehozunk egy útvonalat. az előző ponttal egy új útvonal-szegmens köti össze. Azt is megtanultuk, hogy egy útvonalat általában úgy hívják, hogy "nem nyomtató elem", ami azt jelenti, hogy függetlenül attól, hogy hány útvonalat adunk hozzá, egyik sem lesz látható a papíron, amikor a képet kinyomtatjuk. . Ezek sem lesznek láthatóak, ha a képet egy weboldalon jelenítjük meg. Az útvonalak csak számunkra láthatók, amikor a Photoshop-on belül dolgozunk (bár más programok, például az Adobe Illustrator is támogatják az elérési útvonalakat). Csak addig, amíg megteszünk valamit az ösvényen, például kitöltjük egy színnel, nem vonunk rá rá rá, vagy konvertáljuk válogatássá, az út csak valami alapvető, nem nyomtatható körvonalavá válik.
Láttuk, milyen könnyű lenne a Toll eszköz segítségével kiválasztani valamit, például egy stoptáblát, egy vonalat körvonalazva, amely egyenes vonalú szegmensek sorozatából áll, majd az utat válogatássá alakítva. Nagyszerű, de valójában még nem tettünk semmit, amit nem tudtunk volna könnyebben megtenni valamivel, mint például a Lasso eszköz, vagy még jobb, ha a sokszögű Lasso eszköz, amelyet kifejezetten a lapos oldalak alakjának, például a mi állomásunknak a kiválasztására készítettek. jel. Ha van valami furcsa érdeklődése a közúti jelzőtáblák miatt, előbb vagy utóbb válasszon egy kicsit érdekesebb dolgot, és az "érdekes" alatt nagyobb kihívást jelent. És a "kihívás" alatt valamit értek, amely görbéket tartalmaz. Ívelt objektum kiválasztása a Photoshop programban általában akkor fordul elő, amikor elveszíti minden tiszteletét az alapvető kiválasztási eszközökkel szemben. Szerencsére az is történik, amikor a Pen Tool valóban ragyog!
Mielőtt folytatnánk, rámutatnék, hogy minden, amit eddig megtettünk, elég egyszerű volt. Kattintson ide, kattintson ide, konvertálja az elérési utat kiválasztott elemre, kész. Ez a következő rész, ahol a görbék rajzolására kerülünk, nem egészen olyan egyszerű, bár ez természetesen nem nehéz, de ha ez az első alkalom a Pen Tool használatához, vagy ha nincs sok tapasztalata ezzel, a görbékkel való munka kicsit természetellenes és még kissé elsöprő is. Ez határozottan itt a "motoros biciklizés" analógia. A kezdetben néhányszor leeshet, és azon tűnhet, hogy valakinek miként sikerült ezt megtennie, de minél többet gyakorolsz, és minél jobban ragaszkodsz hozzá, annál értelmesebb ez az egész elkezdi csinálni. Egy pillanat alatt másodlagosnak tűnik számodra, és hirtelen meg fogja érteni, miért esküszik olyan sok ember, hogy a Pen Tool az egyetlen legnagyobb szelekciós eszköz a Photoshopban! Komolyan, igazából van.
Fogantyú megszerzése az irányított fogantyúkhoz
Kezdjük újra a Pen Tool programmal. Nyisson meg egy új üres Photoshop dokumentumot, vagy egyszerűen törölje az eddig elvégzett dokumentumokat a meglévő dokumentumban, így kezdjük újra. Ezután a kiválasztott Toll eszköz és az Opciók sávban kiválasztott útvonalak között (ne feledje, hogy alapértelmezés szerint az Alak rétegek opciót választja, ezért ellenőriznie kell, hogy a Path opciót választotta-e), kattintson egyszer a dokumentum bármelyik oldalára, csakúgy, mint korábban tettük. Ezúttal ahelyett, hogy csak egy rögzítési pontot szeretne hozzáadni, kattintson rá, majd húzza az egeret rövid távolságra a rögzítési ponttól, majd engedje el az egérgombot:
Kattintson a Dokumentum bármelyik oldalára a Toll eszköz segítségével, majd húzza kissé távol a rögzítési ponttól.
Ha elkészült, látni fog egy rögzítési pontot, amelyből két vonal húzódik ki. Első pillantásra azt gondolhatja, hogy valahogy sikerült kihúznunk egy utat a Pen Tool segítségével. Végül is úgy néz ki, hogy három rögzítési pontunk van, az egyik mindkét végén, a másik a közepén, és két útvonal-szegmens köti össze őket. Ha kissé közelebbről nézzük meg, láthatjuk, hogy mindkét végük pontjai kissé kisebbek, mint a középső, és valójában más alakúak. A középső négyzet alakú, és amint láttuk, a rögzítési pont négyzet alakú, de mindkét végük gyémánt alakúnak tűnik. Néhány rögzítési pont négyzet alakú és gyémánt alakú?
Dehogy. Az összes rögzítési pont négyzet alakú, és azonos méretűek, azaz azok a kisebb, gyémánt alakú pontok a végén, amelyek nem rögzítési pontok. És ha nem horgonyzási pontok, ez azt jelenti, hogy a vonalak nem útvonal-szegmensek, mivel legalább két rögzítési pontra van szükségünk egy útvonal létrehozásához, és jelenleg az egyetlen rögzítési pont van a közepén. Szóval mi pontosan azok a vonalak, amelyek kinyúlnak a rögzítési ponttól? Ők irányító fogantyúk!
"Ó, irányító fogantyúk!" te mondod. "Most már értem!"
… … …………….
- Várj, nem, nem. Mi a fene az irányfogantyúk?
Az irányfogantyúk fogantyúk, és csak görbe pályaszakaszok létrehozásakor használják őket. Az egyenes út szegmensek létrehozásakor nincs szükség irányfogantyúkra. Általában kettő van, bár néha csak egy, és mint már láttuk, a horgonypontokból kinyúlnak. "Fogantyúknak" hívják őket, mert amint egy pillanat alatt meglátjuk, valójában megragadhatod őket és mozgathatod őket.
Az irány kezeli a két dolgot. Szabályozzák a görbe szögét és a görbe hosszát, és igazán szépen teszik. Ennek oka általában két, mert az egyik a rögzítési pontba érkező görbe szögét és hosszát, a másik pedig a rögzítési pontból kifolyó görbe szögét és hosszát vezérli.
Mielőtt megvizsgálnánk, hogyan lehet görbéket rajzolni az irányító fogantyúkkal, először nézzük meg, hogyan vezérelhetjük magukat a fogantyúkat, mivel a görbék rajzolásában játszott sikereink nagyban függnek a fogantyúk irányításának képességétől. Ne aggódjon, ez nem, mint mondják, rakétatudomány. Csak néhány egyszerű dolog, amit meg kell tanulnia. Már láttuk, hogyan lehet irányító fogantyúkat létrehozni, ha rákattintunk a Pen Tool-ra, majd húzzuk el a rögzítési ponttól. Minél távolabb húzzuk a rögzítési pontot, annál hosszabb az irányfogantyú. Minél hosszabb a fogantyú, annál hosszabb a görbe. Rövid fogantyú, rövid görbe. Hosszú fogantyú, hosszú görbe.
Az egyik kedvező dolog, amelyet meglehetősen gyorsan megtanulsz a Pen eszközről, hogy rendkívül megbocsátó. Nincs ok arra, hogy aggódjon amiatt, hogy a dolgok első ízben rendeződnek, amikor utat rajzolnak vele, mert visszatérhetünk és javíthatunk a dolgokon, amikor kész! Helyeztél egy rögzítési pontot a rossz helyre? Nincs mit! Csak mozgassa oda, ahol szüksége van rá! Látjuk, hogyan lehet ezt egy pillanat alatt megtenni. Húzott egy irányfogantyút rossz irányba? Nem probléma. Fogja meg a fogantyút, és forgassa el a kívánt irányba. Megint meglátjuk, hogyan lehet ezt csinálni. Az egyik irányító fogantyúja túl hosszú vagy túl rövid? Semmi gond. Csak kattintson rá, majd húzza hosszabbra vagy rövidebbre, ha szükséges (igen, meglátjuk, hogyan is csináljuk). Az útvonalak mindig teljes mértékben szerkeszthetők, így egyáltalán nincs ok aggódni, hogy hibát követ el, vagy az első alkalommal helyesen javítja. Ez nem teszi jobban érezni magát?
Forgási és átméretezési irányfogantyúk
Mint már említettem, irányító "fogantyúknak" hívják őket, mert megfoghatják őket, mint a fogantyúk, és mozgathatják. Lássuk, hogyan kell csinálni. Először megvizsgáljuk, hogyan lehet elforgatni mindkét fogantyút egyszerre. A rögzítési pont és a már létrehozott két irányító fogantyú segítségével tartsa lenyomva a Ctrl (Win) / Command (Mac) gombot. Látni fogja, hogy a Toll eszköz ikonja átmenetileg a Közvetlen kiválasztó eszköz (a fehér nyíl) ikonjává válik, és az az oka, hogy a Toll eszköz kiválasztása esetén a „Ctrl / Parancs” tartása gyors parancsikává teszi a Közvetlen kiválasztó eszköz ideiglenes elérését, amely a amit útunk különféle részeinek kiválasztására használunk. Ezután egyszerűen kattintson közvetlenül a kicsi gyémánt alakzatra az egyik irányfogantyú végén (maga a "vonalra" kattintás nem működik, tehát mindig meg kell kattintania a fogantyú végén található gyémánt alakra, hogy bármit megtehessen) vele) és húzza a rögzítési pont körül, hogy elforgassa. Amint elforgatja az egyik fogantyút, a másik fogantyú az ellenkező irányba forog, mint egy fűrész. Azt is észreveheti, hogy amint elkezdi húzni a fogantyút, az egérmutató ikonja ismét megváltozik, ezúttal az Áthelyezés eszköz ikonra, mivel valamit áthelyezünk egyik helyről a másikra:
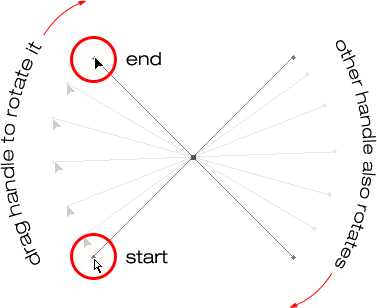
Tartsa lenyomva a "Ctrl" (Win) / "Command" (Mac) gombot, majd kattintson az egyik irányfogantyú végére, majd húzza meg a fogantyút, hogy elforgassa a rögzítési pont körül. Az egyik fogantyú húzásakor a másik az ellenkező irányba forog.
A „Ctrl / Command” gombot elengedheti, miután elkezdett húzni a fogantyút. Nem kell egész idő alatt lefelé tartani.
Az irányfogantyú átméretezéséhez forgatás közben egyszerűen húzza a fogantyú végét a rögzítési pont felé, hogy rövidebbé váljon, vagy húzza el a rögzítési ponttól, hogy hosszabb legyen. Mint fentebb említettem, egy rövidebb fogantyú rövidebbé teszi a görbét, egy hosszabb fogantyú pedig hosszabbá teszi a görbét. Ugyanakkor nem lehet átméretezni mindkét fogantyút, tehát ha mindkettőt át kell méretezni, mindegyiket hosszabb vagy rövidebbre kell húzni külön-külön. Az egyetlen, amit mindkettővel egyszerre megtehetsz, az elforgatás. Ha már elengedte az egérgombot a fogantyúk elforgatása után, és a kurzor visszatért a Pen Tool ikonra, és át kell méreteznie az egyik fogantyút, akkor ismét tartsa lenyomva a „Ctrl / Command” gombot váltson vissza a Közvetlen kiválasztó eszközre, majd kattintson és húzza a fogantyú végét az átméretezéshez:
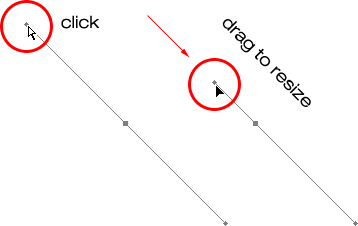
Húzza a fogantyúk végeit a rögzítési pont felé, hogy rövidebbé tegye, vagy húzza el őket a rögzítési ponttól, hogy hosszabbak legyenek.
Most nézzük meg, hogyan lehet elfordítani a fogantyúkat egymástól függetlenül. To rotate one handle without affecting the other one, first release your mouse button if you've been rotating or resizing the handles so your cursor changes back into the Pen Tool icon. Then, instead of holding down "Ctrl/Command", which moves both handles at once, hold down your Alt (Win) / Option (Mac) key and click on the end of either of the direction handles. You'll see your cursor change into the Convert Point Tool icon, which looks like a simplified arrow made of only two lines, almost like an upside down letter "v" (except that it's not quite upside down). Then, simply drag the handle around the anchor point to rotate it, just as you did before, and this time, the handle will rotate independently of the other one, breaking the connection between them:
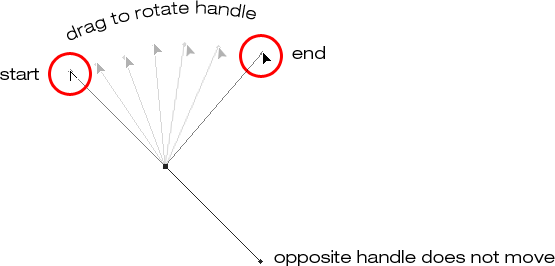
Hold down "Alt" (Win) / "Option" (Mac) and click on the end of either of the direction handles, then drag the handle to rotate it around the anchor point independently of the other handle.
Again, you can release your "Alt/Option" key after you've started dragging. You don't have to hold it down the whole time.
You can also resize direction handles using the "Alt/Option" key in exactly the same way as you can with the "Ctrl/Command" key. If you're in the process of rotating a handle, simply drag it in towards the anchor point to make it shorter or away from the anchor point to make it longer. If you've already released your mouse button and your cursor is showing the Pen Tool icon again, you'll need to hold down "Alt/Option" once again, then click on the end of the handle and drag it to resize it.
Is there a difference between resizing the handles using "Ctrl/Command" and using "Alt/Option" to do it? Yes there is. If you haven't yet "broken the connection" between the handles by dragging one independently of the other, resizing a handle using "Ctrl/Command" will keep the handles connected together. It won't resize both handles at once, but it won't break the connection between them either so you'll still be able to rotate them together if you need to. If you resize a handle using "Alt/Option", you'll break the connection between the handles. Even if you don't rotate the handle as you're resizing it, the connection will still be broken.
What if you've broken the connection between the handles by rotating them using "Alt/Option" and then want to rotate them together again? Can you "rebuild the connection", so-to-speak, by selecting one of them while holding down "Ctrl/Command" as before? Good question, and the answer is no. Once you've broken the connection between the handles, the "Ctrl/Command" key on its own won't bring it back. You'll need to select one of the handles while holding Ctrl+Alt (Win) / Command+Option (Mac) at that point in order to move the handles together again.
Quick Summary So Far …
We've covered a lot of information here about working with direction handles, so before we move on and start drawing some actual curves, let's do a quick recap:
- To add an anchor point, simply click with the Pen Tool.
- To add an anchor point with direction handles extending out from it, click with the Pen Tool, then drag away from the anchor point before releasing your mouse button. The further you drag, the longer the direction handles will be.
- To rotate the direction handles together, hold down Ctrl (Win) / Command (Mac), which will temporarily switch you to the Direct Selection Tool, then click on the end of either handle and drag it around the anchor point. The other handle will rotate in the opposite direction.
- To rotate the direction handles independently, hold down Alt (Win) / Option (Mac), which will temporarily switch you to the Convert Point Tool, then click on the end of either handle and drag it around the anchor point. The other handle will not rotate.
- To resize handles without breaking the connection between them, hold down Ctrl (Win) / Command (Mac) to switch to the Direct Selection Tool, then click on the end of either handle. Drag it towards the anchor point to make it shorter, or drag it away from the anchor point to make it longer.
- To resize handles and break the connection between them, hold down Alt (Win) / Option (Mac) to switch to the Convert Point Tool, then click on the end of either handle. Drag it towards the anchor point to make it shorter, or drag it away from the anchor point to make it longer.
- To rotate the direction handles together after breaking the connection, hold down Ctrl+Alt (Win) / Command+Option (Mac), then click on the end of either handle and drag it around the anchor point. The other handle will once again rotate with it.
Okay, that pretty much covers the basics of how to control the direction handles. Let's see how we can use them to draw some curves!
We've covered a lot of ground so far. We know about anchor points and direction handles. We know that in order to draw straight path segments, all we need to do is lay down a series of anchor points wherever we need them simply by clicking with the Pen Tool, and as we add more and more anchor points, we add more straight sections to our path. We know how to create direction handles and how to rotate them, either together or separately, and how to resize them.
We know how to turn a path into a selection by clicking on the "Load path as selection" icon at the bottom of the Paths palette or by simply pressing "Ctrl+Enter" (Win) / "Command+Return" (Mac) on the keyboard. One thing I didn't mention yet is that regardless of whether our path consists of straight lines,
curves, or a combination of straight lines and curves, converting it into a selection is done exactly the same way, and we've already learned how to do it, which means we're well on our way to mastering making selections with the pen! All we need to do is get a bit of practice drawing curves, which is exactly what we're about to do!
Még mindig görget? Töltse le ezt az oktatóanyagot PDF-ként!
Drawing A Curve
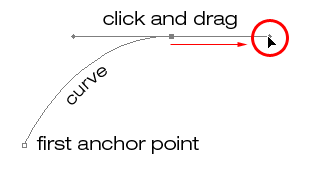
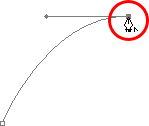
Let's once again start fresh, either by opening up a new blank document in Photoshop or by deleting what you've already done. We're going to draw our first curve so we can put all of our newly-aquired direction handle knowledge to use. First, with the Pen Tool selected and the Paths option selected in the Options Bar, click once somewhere in your document to add an anchor point. Just click, don't click and drag. You should have one single anchor point on the screen when you're done.
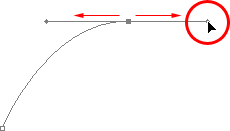
Then, move your mouse cursor up and to the right of your initial anchor point. Click again to add a second anchor point, but this time, drag your mouse a little to the right of the anchor point to drag out direction handles. Hold down Shift as you drag to constrain your movement to a horizontal direction. As you drag out the direction handles, you'll see your path appearing as a curve between the two anchor points! The further you drag your mouse, the longer you make the direction handles, and the more of a curve you create:
Click once to add an anchor point, then click and drag out a second anchor point with direction handles, creating a curved path segment between the two points.
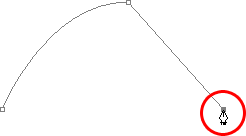
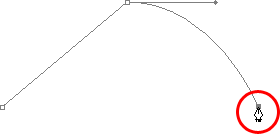
Click down and to the right of the second anchor point to add a third anchor point. This time, don't click and drag, just click:
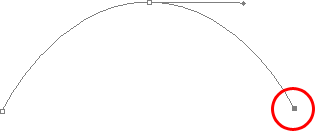
Add a third anchor point down and to the right of the second one by clicking with the Pen Tool.
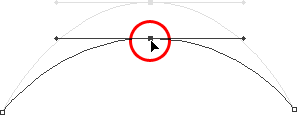
As soon as you add the third anchor point, a second path segment will appear, joining the second anchor point with the third one. And because our second anchor point has direction handles extending from it, this new path segment is also curved! We now have a nice, smooth arc starting from the first point on the left, then passing through the anchor point with the direction handles up top, and coming to an end at the third point.
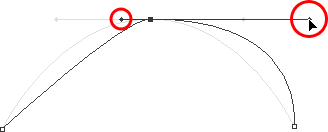
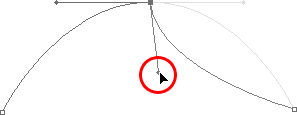
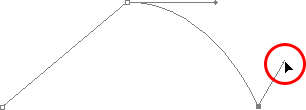
One thing you may have noticed, and you can see it in the screenshot above, is that when you added the third anchor point, the direction handle extending out the left side of the second anchor point disappeared. It's still there, Photoshop simply hid it from view. To see it again, use the keyboard shortcut we've already learned to temporarily switch to the Direct Selection Tool, which is by holding down the Ctrl (Win) / Command (Mac) key, and then click on the second anchor point to select it. As soon as you do, the missing direction handle reappears as if it was there the whole time (which it was):

Hold down the "Ctrl" (Win) / "Command" (Mac) key to temporarily switch to the Direct Selection Tool, then click on the top anchor point to select it. The missing anchor point reappears.
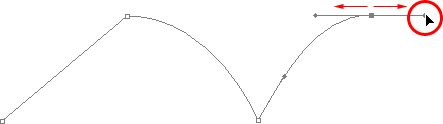
With your "Ctrl/Command" key still held down so you still have access to the Direct Selection Tool, try resizing each direction handle by clicking on the end of each one to select it and then dragging it towards and away from its anchor point. Again, hold "Shift" as you drag to constrain your movement horizontally, and watch what happens. As you increase the length of a handle, you get more of a curve, and as you decrease its length, you get less of a curve. Also notice that each handle controls its own side of the curve. The handle on the left controls the curve coming into the anchor point from the left, and the handle on the right controls the curve flowing out from the anchor point on the right.
Here, I've made my handle on the left shorter, and as we can see, there's much less of a curve now than there was originally, almost becoming a straight line. I've also made the handle on the right longer, and as a result, the curve on the right is now much more pronounced. The faint curve is the original for comparison:
Change the shape of the curves by resizing the direction handles. The left handle controls the left curve, and the right handle controls the right curve.
I'm going to undo my changes by pressing Ctrl+Alt+Z (Win) / Command+Option+Z (Mac) a couple of times to set my direction handles back to their original sizes so they're equal length once again. Now let's try rotating the handles. Hold down "Ctrl/Command" once again to access the Direct Selection Tool, then click on the end of either handle to select it and try rotating it around the anchor point. Since we selected the handle with "Ctrl/Command", both handles rotate together. Here I've dragged my left handle down and to the right, and the angle of the curve on the left changed along with it, now appearing as more of a slope as it rises up towards the anchor point. By dragging the left handle down and to the right, I caused the right handle to rotate up and to the left, and again, the angle of the curve on the right changed along with it, now rising above the anchor point briefly before making a steep decent down to the anchor point on the right. Again, the faint curve is the original for comparison:
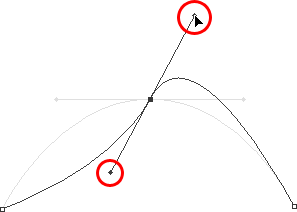
Rotate the direction handles to change the angle of the curves. Select a handle while holding "Ctrl" (Win) / "Command" (Mac) to rotate both handles together.
The Dreaded "Loop"
One thing you want to avoid is rotating the handles too far, which will cause your path segments to overlap and create loops. Here, I've rotated my handles all the way around so that the left handle is now on the right and the right handle is on the left, and notice what's happened. My path segments are now overlapping each other, creating a loop:
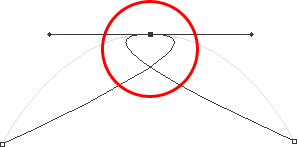
Rotating the direction handles too far causes the path segments to overlap, creating an unwanted loop in the path.
Loops can be caused by rotating the direction handles too far, as I've done above, but more often than not, they're caused by a handle being too long, making the curve too long and causing it to overlap with itself. If that happens, which it does sometimes as you're drawing a path, simply shorten the length of the direction handle. Most people end up creating a whole bunch of loops in their path when they first start working with the Pen Tool, so don't think you're the only one. No need to panic or become frustrated though. As I said, the problem is most likely being caused by a direction handle being too long, and all you need to do is shorten the handle to "un loop" the loop!
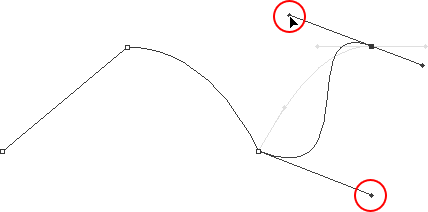
I'm going to press Ctrl+Alt+Z (Win) / Command+Option+Z (Mac) a few times once again to undo my changes and reset my path back to the nice smooth arc I started with. Now, what about rotating the direction handles independently of each other? As we learned on the previous page, to rotate the handles separately, instead of selecting them with "Ctrl/Command", we simply select them while holding down Alt (Win) / Option (Mac), which gives us temporary access to the Convert Point Tool. Click on the end of a handle to select it, then drag it with your mouse to rotate it and this time, the other handle will stay in place, breaking the connection between them.
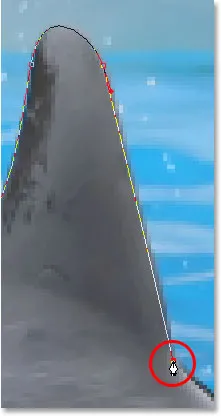
Here, I've selected the handle on the right while holding "Alt/Option" and then rotated it down and to the left. Notice how once again, the angle of the path segment on the right changes to match the new direction of the handle, and this time, the handle on the left, along with the path segment on the left, both stay in place. My path now looks a bit like a shark fin:
Hold down "Alt" (Win) / "Option" (Mac) to temporarily access the "Convert Point Tool", then click on the end of a direction handle to select it and rotate it independently of the other handle.
Moving An Anchor Point
One thing we haven't looked at yet is how to move an anchor point. If you recall, I mentioned on the previous page that the Pen Tool is extremely forgiving, and one of the reasons for it, besides being able to rotate and resize our direction handles after we've created them, is that we can easily move anchor points from one spot to another if we need to. As we've already learned, anchor points anchor a path into place. The anchor points themselves, however, are not anchored into place. You can move an anchor point anywhere, anytime, and any path segments that are connected to it will move and adjust right along with it.
To move an anchor point, hold down Ctrl (Win) / Command (Mac) to temporarily access the Direct Selection Tool as we've already been doing, then simply click on the anchor point to select it and drag it to its new location with your mouse. Any path segments connected to it will move with it to the new location. Here, I've dragged my middle anchor point down a bit from its original location (again, the faint path marks the original location for comparison). Notice how the path itself has changed shape to adjust to the new location of the anchor point:
Hold down "Ctrl" (Win) / "Command" (Mac) and click on an anchor point to select it, then drag it to a new location. Any path segments connected to the point will move with it, changing shape as needed.
Normally, when outlining an object with a path to select it using the Pen Tool, you won't need to move to an anchor point quite as far as what I've done above, but it's very common to go back around your path after you've created it and nudge a few anchor points here and there to fine-tune the path. Once you've selected an anchor point, you can nudge it up, down, left or right using the arrow keys on your keyboard.
Combining Straight Paths With Curves
What if I didn't want both of my path segments to be curves? What if what I needed was for the first path segment to be curved, but the second one needed to be straight? Let's see how to do that. I'm going to delete my existing path and start over again. First, I'll click to add an anchor point to start things off. Then, just as before, I'll click to add a second anchor point up and to the right of my initial point, and this time, I'll drag out direction handles, which will create a curved path connecting the two points, giving me exactly what I had way up at the start of this page:
Click once to add an anchor point, then click to add a second anchor point and drag out direction handles to create a curve.
I now have my initial curve, but I want my next path segment to be straight. If I was to simply click somewhere to add another anchor point right now, I would get another curve because I have that direction handle extending out from the right side of the last anchor point I added. What I need to do is get rid of that one direction handle. Without a direction handle controlling the angle and length of a curve, we get a straight line.
To remove the handle, leaving only the handle on the left of the anchor point, all I need to do is hold down Alt (Win) / Option (Mac), which will again temporarily switch me to the Convert Point Tool, and then I just click directly on the anchor point. When I do, the direction handle on the right disappears, leaving only the one on the left:
Hold down "Alt" (Win) / "Option" (Mac) and click directly on the anchor point to remove the direction handle on the right, leaving only the one on the left.
Now, with the direction handle gone, if I click to add a new anchor point, I get a straight path segment between the two points :
With the direction handle on the right now gone, clicking to add a new anchor point adds a straight path segment between the two points.
I now have a curved path segment on the left and a straight one on the right! What if I wanted the exact opposite? Suppose I needed to start with a straight path segment and then follow it with a curve? To do that, first I'll start by clicking to add an initial anchor point. Then, since I want a straight path segment, all I need to do is click somewhere else to add a second anchor point, and I automatically get a straight path connecting the two points:
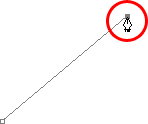
Click with the Pen Tool to add an initial anchor point, then click again somewhere else to add a second anchor point and create a straight path segment between them.
I'm going to keep my mouse button held down after clicking to add my second anchor point because I want my next path segment to be curved, and we know that in order to create a curve, we need a direction handle. To add a handle extending out from the right of my anchor point, I'm going to hold down Alt (Win) / Option (Mac), and with my mouse button still down, I'm simply going to to drag to the right of the anchor point. As I do, a direction handle will drag out along with it:
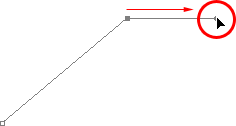
Hold down "Alt" (Win) / "Option" (Mac) and drag out a direction handle on the right of the anchor point.
Notice that the direction handle extended only from the right of the anchor point, not from both sides, leaving my straight path segment on the left in place. And now that I have my direction handle on the right, all I need to do to create my curve is click to add a third point:
Click to add a third anchor point, which creates a curved path segment between the previous anchor point and the new one.
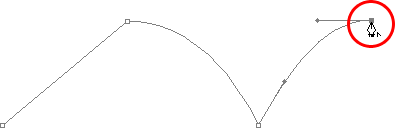
And there we go! I now have a straight path segment on the left, followed by a curved segment on the right. Of course, most paths you draw are going to consist of more than just three anchor points. Let's say I wanted to continue this path, moving in the same general direction towards the right, and I want my next path segment to be curved as well. Just as I did a moment ago, I would leave my mouse button held down after clicking to add my third point. I would hold down Alt (Win) / Option (Mac) and I would drag out another direction handle. So far, we've only been dragging handles out towards the right, but what you really want to do is drag your handles out in the general direction you want the curve to follow. I want to create a curve that goes up and to the right, so I'm going to drag out a small handle in that same general direction:
Drag out your direction handles in the general direction of the curve.
Tipp! A good practice to get into is to keep your direction handles small when first dragging them out, since you never really know how long or at what exact angle they need to be until the actual curve appears, and the curve doesn't appear until you've added both of its anchor points. Once you've added both points and the curve appears, you can easily go back and make any adjustments you need to the handles. You may even want to wait until you've drawn the entire path before worrying about adjusting the handles.
With my direction handle created, I'm going to click to add a fourth anchor point, and I'm going to drag out direction handles from it as well:
Adding a fourth anchor point along with direction handles extending from it.
I now have a third segment added to my path, this one being a curve. Notice that this curve actually has two direction handles controlling it, one extending from the right of my third anchor point and one extending from the left of my fourth point:

The third path segment now has two direction handles, one on either end, working together to control the curve.
The overall shape of this curve is now being controlled by the length and direction of both of these handles. Watch what happens to the curve when I move the handles. I'll drag the bottom handle down and to the right, and I'll drag the top handle up and to the left. I'll also drag both of these handles longer. The faint curve is the original for comparison:
Changing the direction and/or length of either handle changes the overall shape of the curve. After rotating and lengthening both handles, the curve now appears in an "S" shape.
The curve is now a bit "S" shaped, and that's because the bottom handle is controlling the angle and length of the curve as it flows out from the third anchor point, while the top handle is controlling the angle and length of the curve as it flows into the fourth point. Changing the length and/or direction of either handle will change the overall shape of the curve.
I'm going to press Ctrl+Alt+Z (Win) / Command+Option+Z (Mac) a couple of times to undo the changes I made, so the curve is once again in a simple arc shape as it was a moment ago, and I think I'll finish off this path with another straight segment, which means I'll need to remove that direction handle extending out from the right side of the fourth anchor point. We've already learned how to do that, by holding down Alt (Win) / Option (Mac) and clicking directly on the anchor point itself:
Hold down "Alt" (Win) / "Option" (Mac) and click directly on the anchor point to remove the direction handle on the right.
With the direction handle gone, all I need to do now to add a straight path segment is click to add another anchor point:
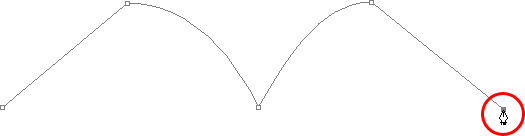
The direction handle on the right is now gone, so we can add a straight path segment simply by clicking to add another anchor point.
We could continue this path for as long as we wanted, adding more straight segments and curves, but I think we'll stop here because we've pretty much covered everything we need to know about drawing paths with the Pen Tool at this point. That was a lot of information to take in, especially if this is your first time learning about paths. As I mentioned at the beginning, you won't become a Pen Master simply by reading through this tutorial, just as you won't learn how to ride a bike, or drive a car, learn to swim, or play the piano simply by reading about it. But hopefully you have some sense at this point of how to draw paths with the Pen Tool, how to draw straight path segments, how to draw curves by dragging out direction handles, how to change the length and angle of the curve by rotating and resizing the handles, and how to combine straight and curved segments in a path.
To finish off our look at making selections with the Pen Tool, let's see a practical example of how to select an object with curves.
Here, we have a photo of a couple of dolphins leaping out of the water. Definitely a couple of very curvy creatures:

A photo of two dolphins jumping out of the water.
Let's say we want to select these dolphins so we can use them for a design or a collage, or whatever the case may be. If you were to try selecting them with the Lasso Tool, which is most likely what you would end up using if you didn't know how to use the Pen Tool, not only would you have a tough time, you'd have an even tougher time trying to convince yourself that you were happy with the results when you were done. The reason is because the Lasso Tool simply isn't capable of making curved selections very well. The biggest problem with it, besides being a pixel-based selection tool, is that it relies on you having a steady enough hand to move it smoothly around the curves. Even if you don't suffer from a caffeine addiction, you could drive yourself crazy trying to draw a perfectly smooth curve with your mouse, or even with a pen tablet, and when you've finally given up, you'll still be left with a selection full of rough, jagged edges that just scream "amateur!". No one likes to be called an amateur, especially when there's no need for it thanks to the Pen Tool!
Examine The Object First
Whenever you're about to select something with the Pen Tool, before you begin, take a moment to examine the object carefully to get a sense of where you're going to need to place your anchor points. Forget about all the details in the object and focus only on its shape. Where are the areas where the shape changes direction? Which parts of the shape are straight? Which parts are curved? If there's a curve, is it a smooth, continuous arc or does the angle change at a spot along the curve? Visualize in your mind where you're going to need to place your anchor points, because when you place one, you always want to be thinking about the next one and what the path segment between the two points needs to look like.
A Tool Of Elegance
One more thing to keep in mind is that the Pen Tool is meant to be a tool of elegance . It's not a nail gun or a staple gun. You don't want to just go clicking around your shape adding anchor points all "willy nilly" (that's a technical term). When using it to draw curves, you want those curves to be nice and smooth, otherwise we might as well just stick with the Lasso Tool. To keep the curves flowing smoothly, we need to limit the number of anchor points we use to create them. That's why you want to take a moment to examine the object first and visualize where the anchor points need to be. If you can outline a large section of the shape using only one curve with an anchor point on either end, that's what you want to do, because that's what's going to give you the kind of results you're looking for. The kind of results that scream "definitely not an amateur!".
Let's select these dolphins. I'm going to start my path in the middle of the photo, at the spot where the side of the dolphin on the left overlaps the rear flipper of the dolphin on the right. There's no right or wrong place to begin a path. This is just where I've decided to start. The first part of that rear flipper is straight, so since I don't need a direction handle to create a straight path segment, I'm simply going to click once with my Pen Tool to add my first anchor point, which will serve as the starting point for my path:
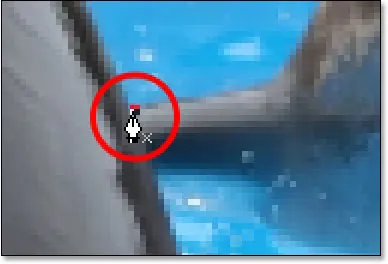
Adding the first anchor point.
As I mentioned earlier, you'll probably find it helpful to zoom in on your image as you're drawing your path. To scroll the image around on the screen as you're zoomed in, hold down the spacebar, which will switch you temporarily to the Hand Tool and allow you to move the image around on the screen by clicking and dragging it.
The top of that flipper actually has a slight curve to it as it approaches the dolphin's tail section, so for my second anchor point, I'm going to click at the point where the flipper and tail section meet, and I'm going to drag out short direction handles, dragging up and to the right in the direction that the tail section is moving. Notice that I've now created a slight curve along the flipper:
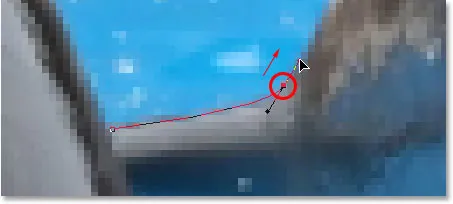
Adding the second anchor point and dragging out small direction handles to add a slight curve to the first path segment.
As I continue up along the tail, I can see that it stays straight for a short distance, followed by a curve to the right, so I'm going to click to add a third anchor point at the spot where the curve begins. This gives me a straight path segment between the previous point and the new one. I know there's a short direction handle extending out from the previous anchor point, which normally means that my new path segment will be a curve, not a straight section, but because the handle is so short and is also moving in the same direction as the path segment, there is no noticeable curve to it. Consider it a "mostly straight" path segment:
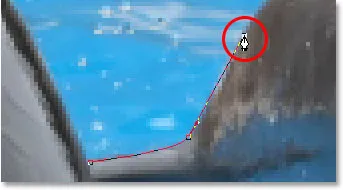
Clicking to add the third anchor point, creating a (mostly) straight path segment.
Continuing along, we come to the first real curve in our path. For this, I'm going to need to drag out a direction handle from the anchor point I just added, so I'm going to hold down Alt (Win) / Option (Mac), then drag out a handle in the general direction where I want the curve to flow as it starts. Notice how I'm only dragging out a handle from the one side of the anchor point, not both:
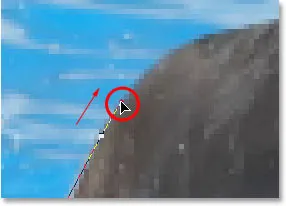
Hold "Alt" (Win) / "Option" (Mac) to drag out a direction handle from one side of an anchor point.
To add the curve, I'll click and drag at the spot where the curve ends, shaping the curve as I drag out the handles until it matches the curve of the dolphin's tail. If I needed to, I could also go back and change the length and direction of the handle at the start of the curve to fine-tune it, but in this case, I don't need to do that:
Adding an anchor point at the opposite end of the curve and dragging out direction handles from it, rotating and resizing them as needed until the curve matches the curve of the object.
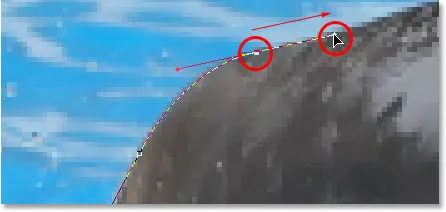
The next area of the dolphin is pretty straight, right up until its back begins to merge with its dorsal fin, at which point there's another curve, so I'm going to click to add an anchor point just before the curve up the dorsal fin begins, which is going to give me another "mostly straight" path segment between the previous point and the new point. Then I'm going to once again hold down Alt (Win) / Option (Mac) and drag out a direction handle as I prepare for my next path segment which will be curved:
Click to add an anchor point, then hold down "Alt" (Win) / "Option" (Mac) and drag out a direction handle to prepare for the next path segment.
The left side of the dorsal fin consists mainly of one continuous curve upward until it gets near the very top, at which point the shape changes, so to create this curve, I'm going to click and drag at the point near the top where the curve will change direction. As we can see in the screenshot, this adds a curved path segment between the previous anchor point and the new one, but the curve is not yet following along the shape of the fin. It's going to need some fine-tuning:
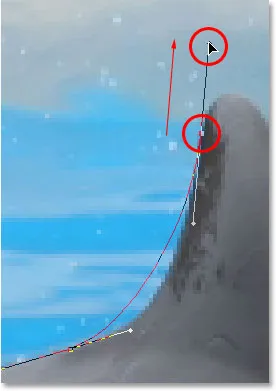
Adding a curve along the left side of the dorsal fin. The curve still needs some adjusting.
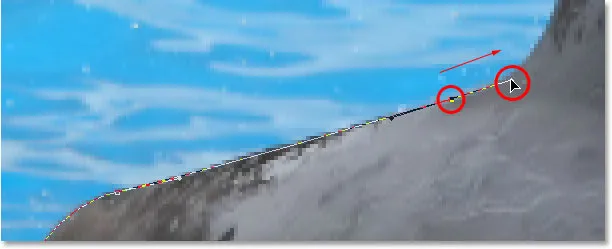
To adjust the curve, I'm simply going to hold down the Ctrl (Win) / Command (Mac) key, which gives me temporary access to the Direct Selection Tool, and I'm going to drag the handle extending out from the bottom anchor point towards the right to lengthen it, which is going to pull the angle of the curve in towards the right along with it, lining it up nicely with the curve of the fin. I've also rotated the top direction handles slightly in a clockwise direction just to be nit-picky, but the majority of the adjustment was done using the bottom direction handle:
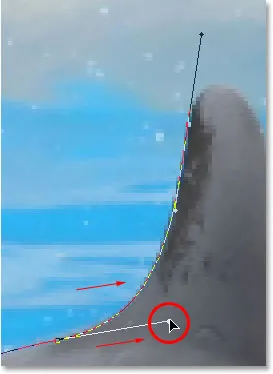
Adjust the curve by adjusting its direction handles.
To add a curve around the top of the fin, I'll click and drag on the opposite side of it to add another anchor point with short direction handles. Notice though that we run into a bit of a problem. The direction handle on the left side of the curve is too long and it's pulling the curve away from the top of the fin:
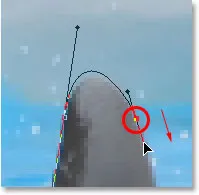
The direction handle on the left of the curve is too long, resulting in the curve not following the shape of the fin.
To fix that, all I need to do is once again hold down Ctrl (Win) / Command (Mac), then click on the end of the handle to select it and drag it shorter until the curve is the proper shape:
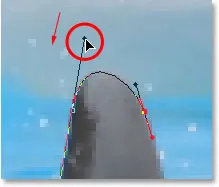
Shortening the length of the direction handle to adjust the shape of the curve.
Let's finish creating our path around the dorsal fin. The remainder of the fin is basically a straight line, so I'm going to click at the base of the fin to add another anchor point which adds the straight path segment, completing our path around the fin:
Adding an anchor point at the base of the fin to finish drawing the path around it.
Since you and I would both be here all day if I was to continue commenting on every anchor point, direction handle and path segment as we make our way slowly around the dolphins, and since we've covered everything we need to know at this point, I'm going to go ahead and draw the rest of the path, outlining both dolphins:
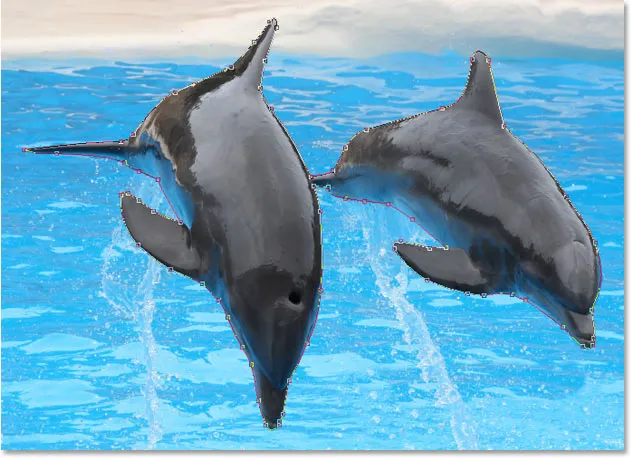
Both dolphins are now outlined by the path.
The dolphins have now been outlined with the path, and if we look at the Paths palette, we can see that sure enough, we have a path in the shape of the dolphins:
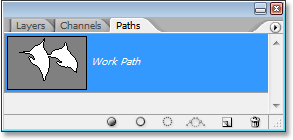
Photoshop's Paths palette showing the outline of the dolphins in the preview thumbnail.
As we've learned, Photoshop automatically names the path "Work Path", which means it's temporary and will be replaced if we start a new path. If you wanted to save it, you would need to double-click on the name "Work Path" and rename it to something else, like "Dolphins" in this case. I'm not going to worry about that, since I have no need to save it. All I want to do at this point is convert my path into a selection, and since I'm already in the Paths palette, I'll do that by clicking on the Load path as selection icon at the bottom of the palette:
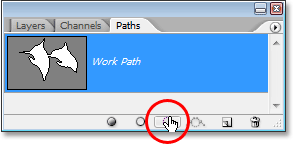
Clicking the "Load path as selection" icon at the bottom of the Paths palette.
I could also have used the keyboard shortcut Ctrl+Enter (Win) / Command+Return (Mac) . Either way converts my path into a selection, and if I look at my photo, I can see that my path has indeed become a selection around the dolphins:

The path around the dolphins has now been converted into a selection.
Hová menj tovább …
És ott van! The dolphins are now selected and ready for whatever plans we have for them. And with that, we wrap up our look at drawing paths and making selections with the Pen Tool in Photoshop! A Photoshop kiválasztó eszközeiről bővebben a Hogyan válasszunk ki a Photoshop sorozatban című részben talál. További Photoshop témákért látogasson el a Photoshop alapjai részre.